Sunday, February 12, 2012

SAL FRIENDSHIP HEARTS PART 3.

Time spent on finishing your hearts will make all the difference to the finished results.
First cut from white or matching felt,  2 hearts the same size as your original one. It is important to have a sharp edge when the fabric is turned in round the felt, so you need to trim these felt hearts slightly. Note some pulled thread stitches will alter the original size and if you are using a heavy fabric 26 -28 counts these will be slightly more bulky so again don't have the felt right up to the back stitched  edge where you turn your linen over. Worth taking the time at this stage to get it just right.

 
 Cut round your linen hearts about half cm out from your back stitching. then turn in along your back stitching to make a sharp edge press first with your fingers then if need be with an iron, this edge is very important to the next stage of construction. Open out the fabric again place the felt heart behind then fold edges in again and TACK TO HOLD IN PLACE. do the same for both the front and the back pieces. Note the one above has moved slightly in the scanner the felt should be just a fraction inside the stitching.
Next add any extra decorations. I often add small butterflies or dragonflies  and as these are heavier than the beads it is a good idea to stitch them on once the felt has been put in place behind. Now stitch in place the cord or ribbon for the hanger stitch this to the inside of the back piece. If using ribbon I recommend a narrow satin ribbon as it will stand up to the test of time much better than a silk ribbon. Do you make your own cords ?   these made with matching thread these are my preference.
 sometimes I finish with a tassel at the bottom or a lovely pear shaped crystal bead add these now if you wish.  If you plan to add a tiny bow at the point where the ribbon or cord comes out, leave this till you have finished putting it all together. I like to use narrow silk ribbon if I can as it will sit flatter then other types.

Next pin the two piece together and using the same thread that you back stitched round the edges whip through these stitches to join the pieces together. I then finish off with a buttonhole stitch edge . small stitches worked into the whipped back stitches and just catching the fabric as you stitch. There are different buttonhole stitches and the one I favour is the one I was taught many,many years ago for making buttonholes on garments, (also called looped edging stitch) it is worked from the back to the front and forms a very neat edge. Keep these stitches small and close together.


  If you plan to edge your heart with a braid, add this to the front heart shape,  stitching it on from the back.,  I like to show only the edge of the braid to keep the heart looking dainty.  here are tow of my favourite braids, I wonder what you can find in your shops I'm sure you will probably have different choices.


Now continue by slip stitching the back in place and you may widh to add a finishing touch here. I Hope you have enjoyed making your little hearts and that your friends might be the lucky ones to receive them. I Thank you all for your comments specially the ones telling me of your progress.
Here is another idea how you can use a small heart, this one was stitched on fine linen, the edge buttonholed ( including the loops) then added on the centre front of a needlebook.


Thursday, February 9, 2012

SAL FRIENDSHIP HEARTS PART 2


Do you know Honeycomb stitch ? This is the stitch I have used for this little heart. Any pulled thread stitches can be used and I will show you some others as well. I have worked the top row shown first  after carefully counting out the spaces of threads (groups of 4) to make sure I have the stitching nicely centred.  This stitch is pulled slightly and I have stitched it with a perle 12 thread, I enjoy using perle 12, tencil, wildflowers and other threads I can use singly.
Don't start the stitching too high up on your heart leave room at the top to add to your design , sometimes I add petite beads to this stitching as shown here.. Mostly I leave the back plain  but if you decide to fill it in with stitches dont add beads as well as it makes it too heavy


To finish I have added chain stitches, a few straight stitches and some beads across the top.

In Part 3 we will look at the construction of the little hearts meanwhile if you have time to fill you might like to try out some other ideas.

This one is worked on the diagonal, satin stitch closter blocks ( that is 5 stitches  over 2 threads, for each block.) Dont pull this stitch have your threads lying nice and flat. Work the first full row  starting at the bottom, then fill the rest in To finish  petite beads have been  added in the squares.


Here I have stitch in the bottom section only, the stitch used was double cross stitch and small beads hadve been stitch in between the crosses. this stitch always looks good and I have used it on several different things.


I do hope you enjoy stitching your little hearts. I will post the final part at the weekend to give you time to stitch some ready
Have fun stitching.

Friends fill your life with joy,
Your soul with sunshine and
Your heart with Love.


Tuesday, February 7, 2012

SAL... FRIENDSHIP HEARTS PART 1

Here is a collection of my small friendship hearts, I enjoy making these little hearts for friends, and they are quick and easy to make. For these ones I used pale pink linen which I have dyed using fruit tea bags. These were Twinings Cranberry, Raspberry and Elderflower ones. It is wise to test a little fabric first, as it depends on the strength and the length of time the linen is immersed . 3-4 teabags and 1/2 tsp salt with very hot water. Then I iron the fabric dry (placing it on an old towel as some of the colour will come out )and have your iron set for linen. I have tried other fabrics but they did not come up as well.'

Make yourself a paper template of a heart shape, my small one is approx 2 inches across at the widest point. I am not sure what size the one I have posted will come out as. So please decide for yourself what size you would like.
You need enough linen to transfer the template onto twice, with generous seam allowance, one can always cut of any extra but to little and you will have spoilt your piece.

Cut out your paper template and pin to your fabric. I never transfer the design using a pencil as it is to hard to cover all the marks. I simply backstitch round the outline and this stitching becomes part of the design. Use a perle 8 or 12 thread for this a single thread is easier to work with in the final stage of the construction and it needs to be strong when the edges are whipped together.  Here I have two different size hearts making the most of my piece of material, however in this SAL I am just giving instructions for the smaller one                      I will leave you with a couple of days to gather up fabric, threads, some small matching beads and narrow ribbon, white or matching felt is needed for finishing.  The SAL will be in three parts, I will post how to do the stitching next.       .

Monday, February 6, 2012

AND THE WINNERS ARE.......


Well its the 6th of February and I promised I would announce today who would receive the Shepherds Bush Chart that I receive from Rowyn. I must add it is a delight to stitch and takes no time at all. I will include the last of the silk thread but sadly there is not enough to stitch it again in the silk but I have matched the colours as closely as I could to DMC shades.

 Have you noticed I have headed this the Winners are?  I have taken Annettte up on her suggestion and will send it to her first and then she has promised to pass it on.... and the name drawn out is


 Gracie of Needles, Pins and Dragonflies blog.
Gracie please email me your postal address so I can include it when I send the chart on. I have resently read about a travelling chart and I think I will make the next one I share like that as I wouls have loved to have sent it to you all

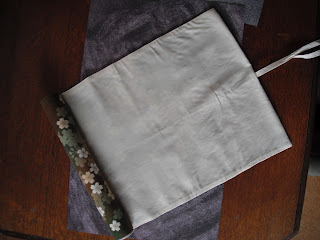
 I have been asked how I store my WIP,  I use a fabric roll, infact I have several of them now, all different sizes. We have even taught the Junior embroiderers not to leave their work in a ring frame, but to store it in a fabric roll when not stitching and Maree who helps with Juniors has made each one a roll. My photos are not very good I photographed a small one so I could get it all in the picture. They are made up of two layers of fabric, the inner one plain light colour suitable to go against your work, at one end a sleeve has been stitched and with  a strong cardboard roll inserted. I have seen some where the ends are also covered in but I have left mine open so I can replace the roll when it gets bent!

I am not sure where the idea came from , it could have been a Patchwork and quilting idea, I was given a large one years ago and would not be with out them now. easy to store and also easy to take your work to a class  The important thing to remember is to lay your work face down, then when you roll it up the stitches will  will have the correct tension on them.

We have had a lovely few days away and I will share our travels with you soon and also have a small SAL which I will post shortly.
Till then
Happy Stitching.